


Tips for confident descending
From our Vice Captain and resident British Cycling Level 2 Coach, Kylie Grant

For those of your that don’t know Kylie, she is one of our Vice-Captains, and a level 2 British Cycling qualified coach with Discipline Specific Units (DSUs) in both Road and Mountain biking. Fun Fact: Kylie holds the club record for descending the hairpin on Quarry Wood, beating even Matt Dunsbier (Cat 2 racer and all round nutter), so she knows what’s she doing!
Tips for confident descending - Written by Kylie Grant, June 2023
Descending can be exhilarating, but if you’re a bit nervous when the road tips down, following are a few tips that might be helpful. A few of the tips are more to do with cornering; however, since we’re likely to encounter corners on our biggest descents, I’ve included a few cornering tips here.
1. Relax and breathe. If you’re feeling anxious, you might find yourself tensing up and not breathing fully. Take notice of any tension, particularly in your shoulders and hands and try to stay supple. Taking long, deep inhalations and exhalations will help keep you in a parasympathetic (relaxed) state.
2. Use the drops. Riding in the drops gives you better leverage on your brake levers than having your hands on the hoods. This position also lowers your centre of gravity, which helps keep the bike stable. It won’t be necessary to ride every descent in the drops; this will depend on factors such as length of the descent, gradient and speed.
3. Shift your bottom to the rear of the saddle. This helps to distribute your weight over both wheels and will reduce the risk of you being thrown forward if you hit a bump or need to brake suddenly.
4. Control your speed. Feathering the brakes – that is, intermittently applying controlled pressure on the brake levers and then fully releasing them - helps to smoothly modulate your speed while also allowing the braking surfaces to cool between applications of the brakes. This is a safer option than gaining too much speed and then braking hard, and is also better for the effectiveness and longevity of your brakes than constantly keeping them partly engaged, known as ‘dragging.’
5. When going in a straight line, keep your pedals at 3:00 and 9:00. Riding with one leg fully locked at the 6:00 position can make you feel stable, but if you hit a bump, you could be thrown out of the saddle. Keeping a bend in your knees allows your knees to act like suspension and absorb small impacts. For rougher surfaces, or even if you just prefer to, you can also hover slightly above the saddle to prevent impacts coming up into your torso, giving you greater control and manoeuvrability.
When riding with pedals at 3:00 and 9:00, you might also like to drop your heels. Combined with hands in the drops and weight shifted slightly rearwards, dropping your heels puts you into the emergency braking position, so if you do need to brake suddenly, you’ll already be in a solid position to do so safely, especially if you’re already hovering above the saddle.
6. When cornering, keep the outside leg fully extended and apply force into the outside pedal while leaning the bike into the corner. Force in the outside leg gives the tyres traction. Outside leg down naturally means your inside leg is up, which also helps prevent the inside pedal striking the road.
7. Constantly look to the vanishing point. The vanishing point is the point where the road seems to taper out and disappear. The vanishing point can give you clues about the direction and camber of the road, helping you to prepare for what might be coming. For example, a vanishing point that is very close could indicate a tight bend or the road tipping down steeply (the direction of the vanishing point will give us clues as to which), whereas one that’s far away tells us that the road is relatively straight for some distance to come.
In Figure 1, when the riders had been a little further back on the road, the vanishing point might have suggested that the road were bending around to the left; however, as they travel, the vanishing point changes and they can now see that the road bends around to the right.
In Figure 2, we can’t see the same vanishing point that the rider can see because it is not in the frame of the photo; however, we can still determine that there is a wide bend to the left and the road appears to incline.
While keeping an eye on the vanishing point, remember to also scan for what’s between it and you. We’re generally going faster when descending so it’s important to look for what’s happening ahead so you can be prepared to respond quickly to changes in the direction of the road, bumps, potholes, animals, traffic and so on.

Figure 1. (Image credit https://unsplash.com/@t_rampersad)
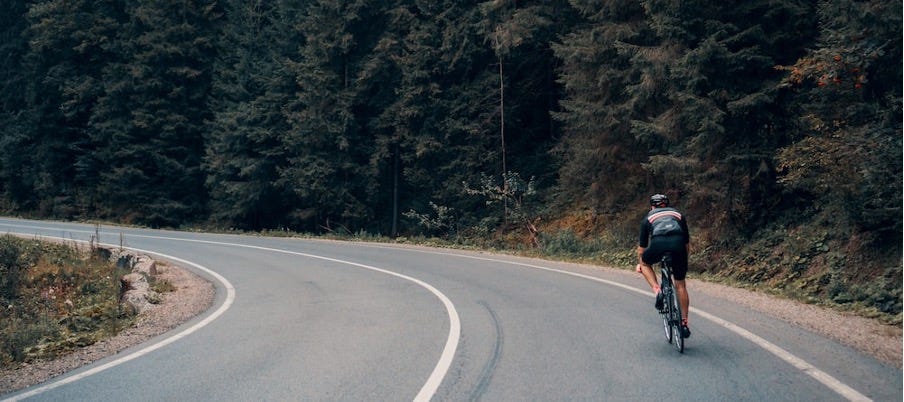
Figure 2. (Image credit https://unsplash.com/@xokvictor)
8. Choose your line. The line you take through a bend will impact how quickly you can ride through it and what you need to do to make it around safely. Figure 3 shows two possible lines through a bend. The red line stays tight to the inside of the bend and you’d want to be going fairly slowly to take this line or have very good bike handling skills to take it at speed. The yellow line (obviously only an option on a closed road but is used to emphasise the difference) starts wide, comes close to the bend at the apex and exits wide – “wide, apex, wide.” A ‘good’ line depends on what’s around you, the speed you’re going, the surface of the road, the weather conditions, how much of the width of the road you can safely use, how tight the bend is and other factors. And remember that you will naturally steer to where you’re looking so remember to look to the exit of the bend as you come into it.
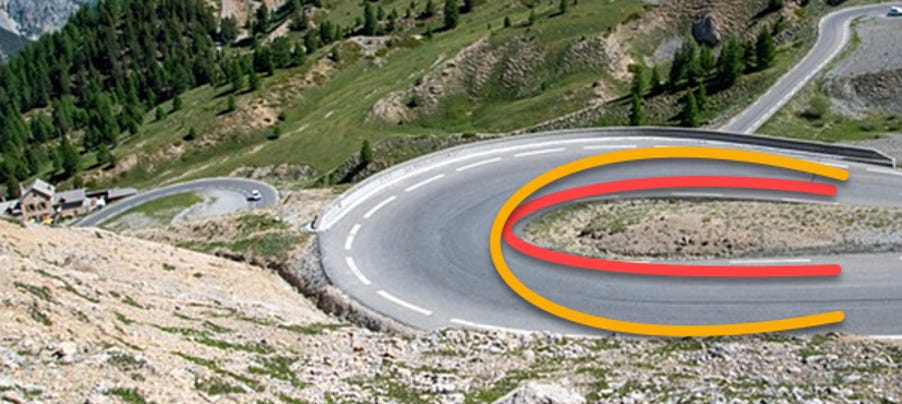
Figure 3. (Image credit https://pixabay.com/users/dendoktoor-14802912/)
While I’m not suggesting any of us try to ride like Tom Pidcock, check out this video
for a properly pro descent of Alpe d’Huez during stage 12 of the 2022 TDF. As you watch, practice looking for the vanishing point, and also observe the lines he takes through the bends.
For further learning, there’s lots of good content online. Some of the channels I like are GCN’s How-To’s and Liv’s Road Bike Guides.
It’s a good idea to practice on the flat or a gradual descent that you can already ride with reasonable confidence as it’s much easier to focus and hone your skills when you’re relatively relaxed. With enough good practice, the techniques become second nature, allowing you to enjoy the descents you’ve worked so hard for.
Great tips Kylie TY. If I may be as bold to offer another, would be to switch your bike computer/head unit to ‘map mode’ when you are about the start descending - especially on unfamiliar roads as gives you idea of what lies ahead on those sweeping bends. (Quick glances when travelling on straights should suffice). Maps too mean you are less likely to be transfixed (bad and good) with the speed.
Very useful thanks. If you have similar insights for going up hill, that would be really useful! Thanks